
The FaceUp native Microsoft Teams integration keeps your team informed without leaving Teams. It automatically sends notifications about new cases, internal comments, messages from reporters, case assignments, and much more directly to your Microsoft Teams workspace, so compliance and HR teams can respond faster, stay aligned, and never miss important updates.
Integration requirements
-
You must have Settings access in your FaceUp account.
-
Important: When connecting your FaceUp account to Microsoft Teams, make sure the email address associated with your FaceUp account matches the email address/tenant of your Microsoft Teams account. If there is no match, you won't be able to enable MS Teams notifications in your FaceUp administration.
Setting up the integration
Option 1: Start from Microsoft Teams
1. In your MS Teams account, navigate to Apps tab on the left menu.
2. Find FaceUp app and click Add.
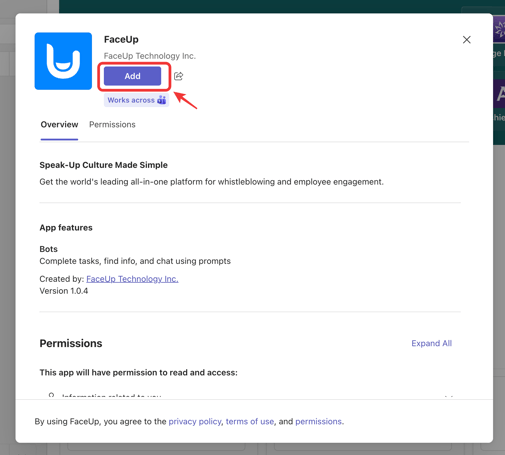
3. You will see a confirmation message that the app was added succesfully.

4. The app has been added to your Microsoft Teams workspace. Now, you need to activate the integration in FaceUp.
After installing the FaceUp app in Microsoft Teams, users may receive one of two messages:
-
Welcome message – Sent upon first installation. Introduces the FaceUp bot and explains its functionality.
-
Activation message – Sent if the Microsoft Teams integration is not activated in FaceUp. Provides instructions to activate the integration.

5. In your FaceUp account, navigate to the Integrations section. Here, find Microsoft Teams and click Add.

6. You will be redirected to the Microsoft sign-in page. After signing in, you will be prompted to grant the necessary permissions for the FaceUp integration. Click Accept to continue.
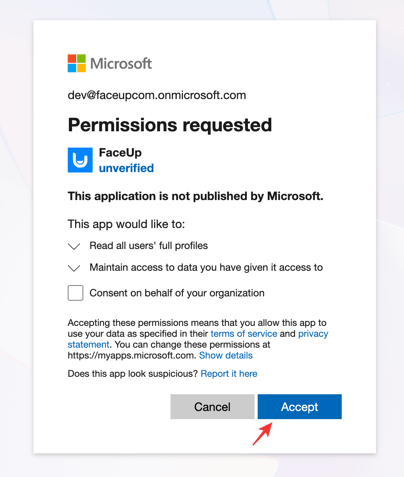
Important! The Microsoft domain used to connect FaceUp (for example, faceupcom.onmicrosoft.com) will be the only domain that can receive Microsoft Teams notifications.
All users enabling Microsoft Teams notifications (see Step 8) must have a FaceUp account with the same domain. If they use a different domain, notifications will not be delivered.
7. On the left corner of the screen, click on your profile button, then select My Account.
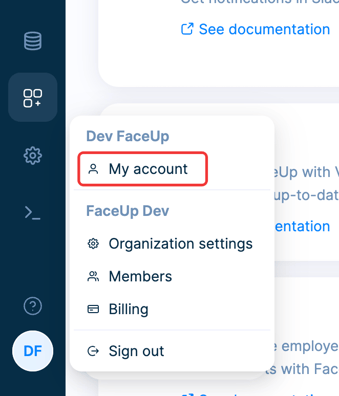
8. Go to the Notifications tab and enable Microsoft Teams notifications.

The user activating Microsoft Teams notifications must have a FaceUp account using the same domain as the Microsoft account used in Step 6 (e.g., faceupcom.onmicrosoft.com).
If the domains do not match, or if the email does not exist in the Microsoft tenant, activation will fail with the error: “Teams user not found."
Good job! With the FaceUp app for Microsoft Teams you'll get notified about:
- Latest reports collected via your reporting channels
- New messages from employees and whistleblowers
- Latest internal comments added to your reports
- Upcoming due dates and deadlines
- New cases assigned to you
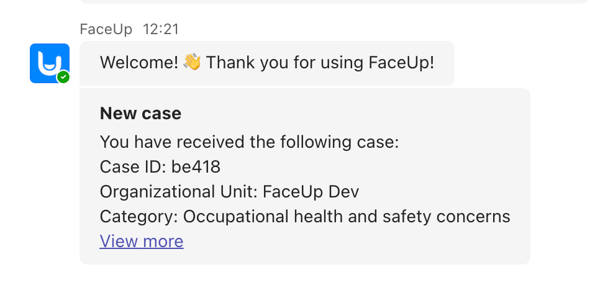
This is how the notification will appear. It also includes a direct link to the report — clicking View more will redirect you to your FaceUp account, where you can view the case details.
Option 2: Starting the setup process from FaceUp
You can also start the connection process from your FaceUp admin. The setup is very similar, but make sure you complete all three steps below to receive notifications:
-
In your FaceUp account, go to Settings → Integrations and connect the Microsoft Teams integration.
-
In Microsoft Teams, open Apps from the left menu, find FaceUp, and add the app.
-
In your FaceUp account, go to My account → Notifications and enable Microsoft Teams notifications.
Important:
All three steps are required. If any of them are missing, notifications will not be delivered to Microsoft Teams.